This article describes the general process of installing InGo into your WooCommerce shop. For the purposes of this type of installation, we will be utilizing "blocks" within WooCommerce to add in your InGo code.
Using Blocks
When editing a WooCommerce page, you have the ability to add different types of content to your pages. For the purposes of installing InGo, we want to utilize the power of Custom HTML blocks on these pages to add your widget scripts and load these on your page.
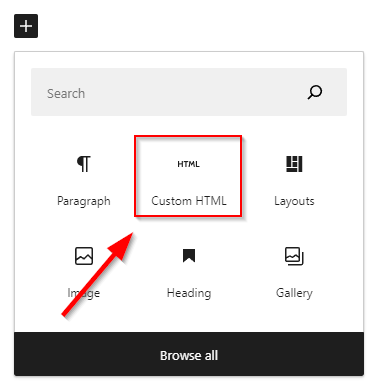
If you are unfamiliar with adding blocks or you are not seeing the option to do so, please see WooCommerce's documentation on blocks for more information. This may require additional configuration or updates to enable.
Setting Up Your InGo Widgets
InGo widgets generally appear in three distinct steps through the registration process: A login or welcome page, a registration or form page, and then a confirmation or "thank you" page. On WooCommerce, these three steps still take place, however the page setup is reduced to two pages (the "Checkout" form page also loads the confirmation message). Due to this variation, we will only need to install InGo in two places.
Adding the Login Widget
For the purposes of this installation, we will be using a variation of the Generic Script-Only version of the Login widget script. For assistance with locating this script to add to your page, please see this article.
Let's navigate to your landing page where we'll first bring users into the shop. This page should usually be placed before a visitor sees any products or can add anything to their cart.
Once on this page and editing mode is turned on, add a new Custom HTML block and copy/paste your login widget script into it. As a reminder, you will want to change the value of the data-ingo-manual attribute to equal the URL of your next page. For WooCommerce, this typically involves just switching the page id number.

We will also be adding a second InGo attribute to this script called data-ingo-forward-query-string. This controls whether query strings are passed to the next page when using the Login widget and is typically "on" by default, however this does not work properly on WooCommerce. The following text should be added to your InGo login script:
data-ingo-forward-query-string="false"
So, all together, your final login script should look something like this:
<script src="https://cdn.ingo.me/widgets/A9F40E61DB4A40F6AB12A596BA2A73E5.js" data-ingo-manual="http://www.insert_your_next_page_where_users_should_land.com" data-ingo-forward-query-string="false"></script>
Don't forget to Update your page by clicking the blue button in the top-right of your page to save your changes.
Adding the Registration Widget, Confirmation, and Social Widgets
We'll first want to navigate to the Checkout page and turn on editing mode. Similar to the Login widget installation, we will be adding a Custom HTML block to the page, however we want to make sure that this block is below any code that sets up your checkout process.
If your InGo script is above the checkout code on the page, InGo will not function properly.
With your HTML block on the page, we'll want to add the following piece of code:
<script>
function addInGo(rwId, cwId, swId) {
const url = window.location.search;
if (!url.includes("order-received")) {
let rwScript = document.createElement('script');
rwScript.src = `https://cdn.ingo.me/widgets/${rwId}.js`;
document.body.appendChild(rwScript);
} else if (url.includes("order-received")) {
let cwScript = document.createElement('script');
cwScript.src = `https://cdn.ingo.me/widgets/${cwId}.js`;
cwScript.setAttribute("data-ingo-attendee.first-name", "[name=\"billing_first_name\"]");
cwScript.setAttribute("data-ingo-attendee.last-name", "[name=\"billing_last_name\"]");
cwScript.setAttribute("data-ingo-attendee.email", "[name=\"billing_email\"]");
cwScript.setAttribute("data-ingo-attendee.company", "[name=\"billing_company\"]");
let swScript = document.createElement('script');
swScript.src = `https://cdn.ingo.me/widgets/${swId}.js`;
swScript.setAttribute('data-ingo-allow-preconfirm-mode', 'true');
document.body.appendChild(cwScript);
document.body.appendChild(swScript);
}
}
addInGo("Registration-Widget-ID", "Confirmation-Widget-ID", "Social-Widget-ID");
</script>
While this piece of code is much larger, we only need to worry about the bottom piece of this where it says:
addInGo("Registration-Widget-ID", "Confirmation-Widget-ID", "Social-Widget-ID");
The only part of the script we will be changing is replacing each placeholder text within quotation marks with its' respective widget ID. For example, where it says "Registration-Widget-ID" should be replace with the widget ID for the Registration widget (also in quotation marks).
Please see the below example for how this should look all together, once fully filled out:
<script>
function addInGo(rwId, cwId, swId) {
const url = window.location.search;
if (!url.includes("order-received")) {
let rwScript = document.createElement('script');
rwScript.src = `https://cdn.ingo.me/widgets/${rwId}.js`;
document.body.appendChild(rwScript);
} else if (url.includes("order-received")) {
let cwScript = document.createElement('script');
cwScript.src = `https://cdn.ingo.me/widgets/${cwId}.js`;
cwScript.setAttribute("data-ingo-attendee.first-name", "[name=\"billing_first_name\"]");
cwScript.setAttribute("data-ingo-attendee.last-name", "[name=\"billing_last_name\"]");
cwScript.setAttribute("data-ingo-attendee.email", "[name=\"billing_email\"]");
cwScript.setAttribute("data-ingo-attendee.company", "[name=\"billing_company\"]");
let swScript = document.createElement('script');
swScript.src = `https://cdn.ingo.me/widgets/${swId}.js`;
swScript.setAttribute('data-ingo-allow-preconfirm-mode', 'true');
document.body.appendChild(cwScript);
document.body.appendChild(swScript);
}
}
addInGo('16E98B25731249CF9D8F7EF3A9878092', 'F549F48A5E334AAAA772F37DB8A2A421', '0E65C4CFE680469CBC7489D5D1A1AC25');
</script>
Once added to your page and completed, click on the Update button to save your changes.
Testing Your InGo Installation
Please refer to the sections below for testing your individual widgets. If anything is not working as expected, please reach out to support@ingo.me.
Login Widget
When testing the Login widget, the following checklist can be used to confirm if this has been set up correctly.
- Does my widget appear on the page as expected?
- Does clicking the "Register with LinkedIn" button, or another social option, properly allow you to authenticate with your credentials?
- After using the login widget, are you redirected to the next page as expected?
Registration Widget
For testing the Registration widget, you will need to have authenticated with a social media account through the Login widget. Please note that the Registration widget does not have a visual UI on the page.
- When reaching the Checkout form, are the following fields auto-populated?
- First Name
- Last Name
- Email Address
- Company (if using LinkedIn only)
Confirmation and Social Widget
The Confirmation and Social widgets work together at the end of the checkout process to allow users to share to social media and help promote your experience.
For the Confirmation widget, this can be tested under the following conditions:
- The Login widget was used by authenticating with a social media account.
- The first checkbox on the Login widget was enabled when using the widget.
If these two things are true, then once you've reached this step a post will automatically have gone out on your social feed. Please review your account's post history for verification.
Please note that auto-posting only occurs the first time you've gone through the registration/checkout process. If testing this multiple times, no additional auto-posts will go out. For assistance resetting this, please reach out to InGo's support team at support@ingo.me.
As for the Social widget, the following checklist can be used to test this:
- Does the widget appear as a pop-up on the page when reaching this final step?
- If choosing to post on social media, does your post properly appear on your account?
- If social authentication was not used on the Login widget, are you able to authenticate socially at this step and post?
- Are you able to invite anyone via email? This can be tested by sending an email to yourself.
- If Meetings functionality is enabled: Are you able to request meetings with other participants?
For any questions or assistance with setting up and/or testing your WooCommerce integration, please contact support@ingo.me.