This article describes the general process for installing your InGo widgets on an Evessio event, and assumes that you are familiar with creating events within InGo. If you have not yet created an event in InGo, please see our article on creating a new event campaign.
As Evessio has a built-in InGo integration, the process of getting things up and running is pretty quick and easy!
Requirements
- An existing event within Evessio
- Three unique pages to install InGo on:
- A home page or landing page
- A form page
- A "Thank You" or confirmation page
Get Started by Gathering Your InGo Widget IDs
If you have already have your widget IDs handy, click here to skip ahead to the Evessio portion of the setup.
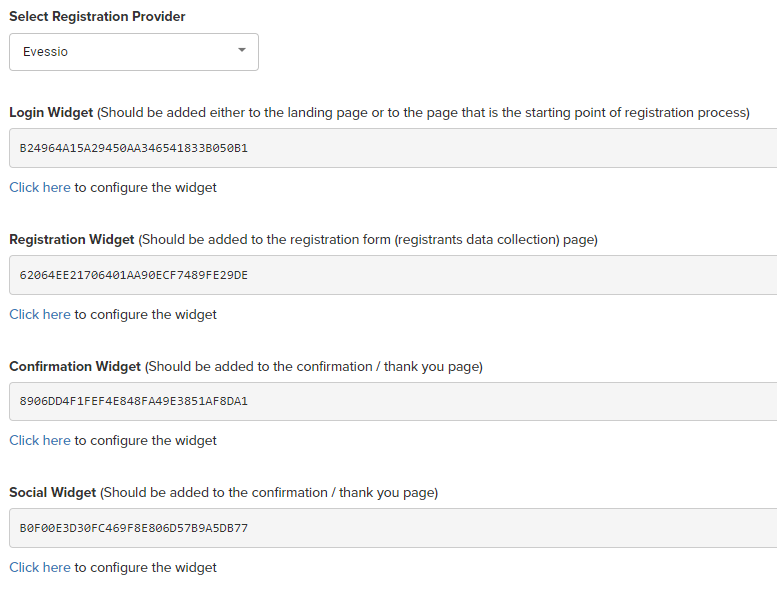
Through your InGo event, we will need to first grab each widget ID so they can be plugged in through Evessio's interface. After selecting which Group's widgets to install, navigate to the Install Widgets page and select Swoogo (a dedicated Evessio option is coming soon, but will look similar) from the dropdown list. A set of four widget IDs should appear on the page, such as shown below.
Keep this page open as we'll need these IDs shortly. In a new tab, open up your Evessio event to finish the setup there.
Building the Widgets on Evessio
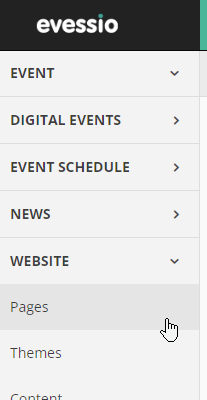
With your event open, click on the Website button in your left navigation, and then select Pages from the dropdown menu. On the Pages List screen, we'll want to first look for a landing or home page to place the first InGo widget: the Login Widget!
Adding an InGo Widget
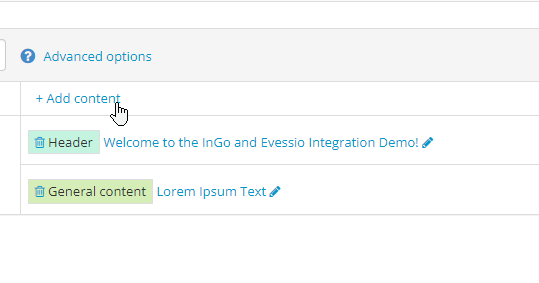
With your home/landing page selected, click on the +Add Content button for where you'd like your widget to live.
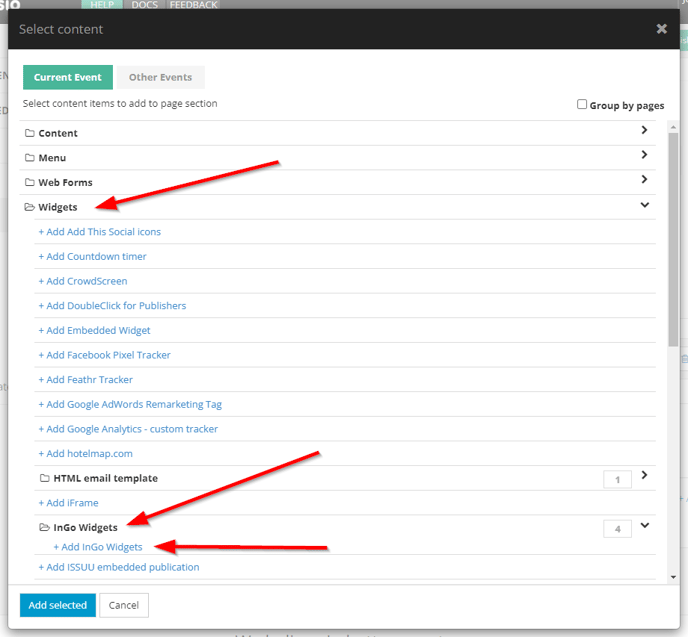
In the pop-up that appears, select options in the following order:
- Widgets, and then
- InGo Widgets, and then
- +Add InGo Widgets
On the next screen, we can build our InGo widgets directly. There will be a few pieces of information we'll have to add here:
- Title - this is not end-user facing and is mainly used for identifying this element through your page editor.
- Is active? - If checked, the widget will be created on the page. If unchecked, InGo will not be present on the page.
- Widget Code - This is where we plug in the IDs we generated earlier through your InGo event.
- Widget Type - Controls which type of widget is created.
- Redirect to this page - This field only appears if the Widget Type selected is Login. The Login widget is designed to redirect your registrants after being interacted with, most of the time to a registration form so they can sign up. This field should link to a form page within your Evessio event or to a direct URL where your registration flow continues.
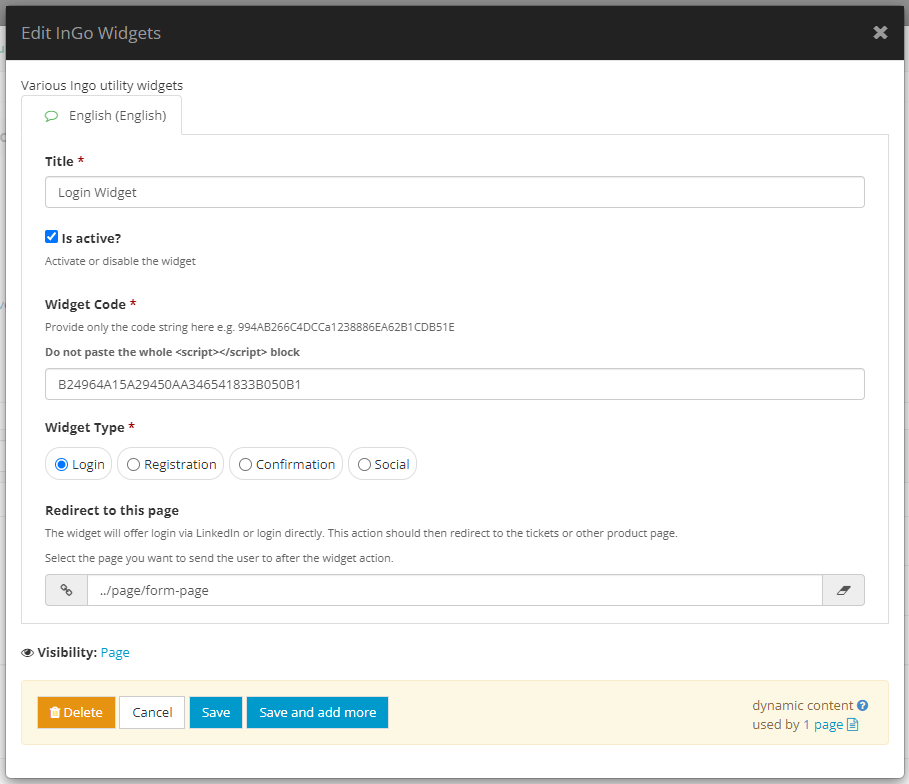
When all fields have been filled out, save your configuration and add the selected option to your page. The widget option should now display within your page content list and you can drag and drop this where you would like.
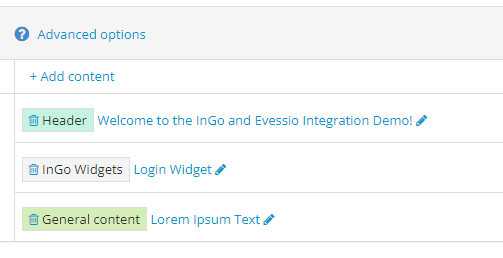
Adding the Login Widget
This widget should be placed on a home page or landing page, at the very beginning of the registration process. Please configure your Login Widget with the following settings:
- Title - Title this "InGo Login Widget" or something similar to help identify this
- Widget Code - Add your Login Widget ID
- Widget Type - Select Login
- Redirect to this page - Select a form page within your Evessio event or another page that acts as the next step in your registration process.
Adding the Registration Widget
This widget should be placed on a form page where users are entering data. Please configure your Registration Widget with the following settings:
- Title - Title this "InGo Registration Widget" or something similar to help identify this
- Widget Code - Add your Registration Widget ID
- Widget Type - Select Registration
There is one additional step that needs to be configured for the Registration Widget, which is mapping your form fields. Please see our article on mapping your registration widget to your form, which will enable autofill functionality and proper data tracking.
Adding the Confirmation and Social Widgets
These two widgets should be placed on the last page of your registration process, such as a "Thank You" or confirmation type page.
Please configure your Confirmation Widget with the following settings:
- Title - Title this "InGo Confirmation Widget" or something similar to help identify this
- Widget Code - Add your Confirmation Widget ID
- Widget Type - Select Confirmation
Please configure your Social Widget with the following settings:
- Title - Title this "InGo Social Widget" or something similar to help identify this
- Widget Code - Add your Social Widget ID
- Widget Type - Select Social
Once all four widgets have been placed within your Evessio event, go you have now successfully installed InGo into your event! There's just one thing left before publishing your new changes... testing!
Testing Your InGo Installation
For widgets with a visual UI, such as the Login and Social widgets, view the preview versions of each of these pages. If you see your InGo widgets appear then you've installed these correctly.
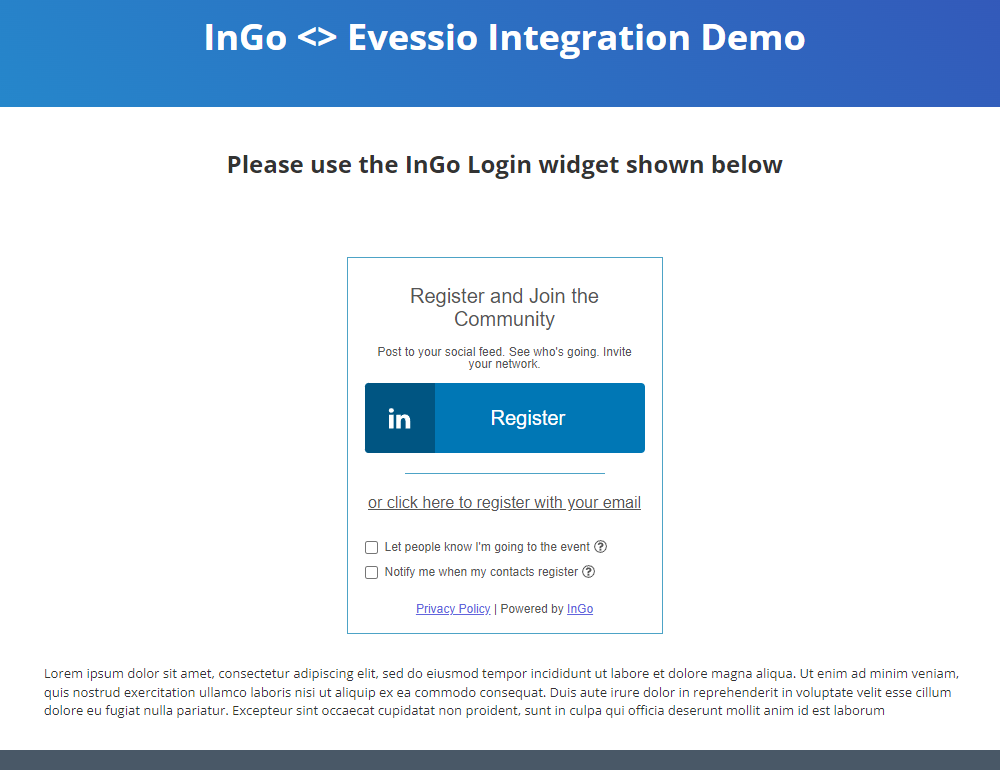
For your Registration Widget, this can be tested by confirming if autofill is occurring successfully. When authenticating with the Login widget, choosing a social option will pull data from your account and populate the form accordingly.
For the Confirmation Widget, this can be tested by going through the entire registration process with a social login and ensuring the first checkbox on the Login widget was selected. This enables an automatic post to go out on your social feed at the end of registration. If you see this post after completing the process, then this has been installed correctly.
And that's it! For any questions or assistance with setting up an Evessio installation, please reach out to support@ingo.me.