This article describes the general process of setting up autofill functionality with your Registration Widget. Please note that autofill is only available for users who register with their social media account via the Login Widget.
To allow our widget to properly auto-populate your form fields, we require these fields to be mapped to tell our system where to put each piece of data. Each field will require a unique identifier via a CSS Selector, and the five primary fields that we recommend configuring are first name, last name, email, company name, and job/role title.
General Requirements
To map your form fields to the Registration widget, unique CSS Selectors must be located and set to tell our system where to put which pieces of information. InGo allows for a variety of selectors to be used to map your form fields, such as id selectors (#), class selectors ( . ), attribute selectors ( [ ] ), and so on. Our team is available to help if assistance is needed with locating appropriate selectors to use for mapping.
Once all applicable selectors have been determined, there are two main ways to map fields through the Registration Widget: through InGo-Admin or through your event platform directly.
Mapping Through InGo Admin
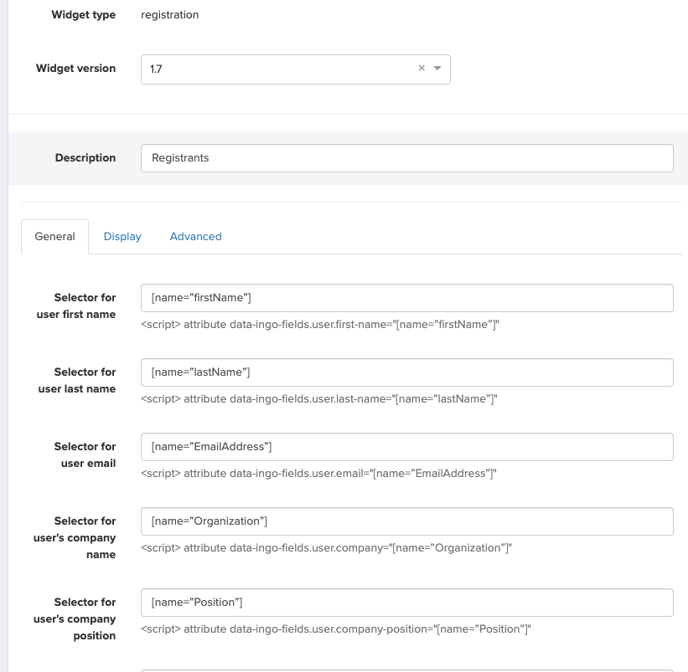
Once you have reached your Widget Configuration page, a list of fields will be displayed under the General tab for the various pieces of data we can collect during a social login.
From here, it's just a matter of copying your selectors into the appropriate field and clicking Save!
Here is an example of a widget that is mapped using name attribute selectors:
Mapping Directly From Your Event
If wanting to map the Registration Widget directly from within your event platform, a Generic Manual widget script must be used. Our script pre-populates the mapping parameters where they would need to be, so your selectors can simply be copied and pasted where the placeholders currently are.
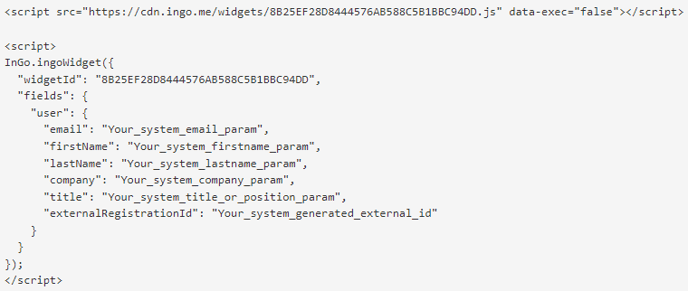
Please keep in mind that the format of the overall code must remain the same, so removing quotation marks or any punctuation that is currently present in the code may cause your widget to not function as expected (or break entirely!).
If you are not using a specific field in your event's form, you may delete the entire line from the script as long as the formatting remains intact.
For any questions or assistance with mapping your Registration Widget, please contact support@ingo.me.