This article provides an overview on how to install InGo on your RegFox event page. Please note that our autofill functionality is not currently compatible with RegFox so the Registration Widget will not be used with this type of installation.
Prerequisites
- If using the Login Widget - an external landing page, outside of RegFox, in a CMS that supports embedding of HTML <script> tags and execution of JavaScript.
- An InGo campaign. For RegFox installations, you will want to use the Generic Script-only option for the Installation Platform
Step 1: Add the Login Widget to the welcome page (outside of RegFox)
- If you are only using the social share options (Confirmation and Social Widget) you can skip to Step 2.
- Login into the InGo admin: https://admin.ingo.me/login using your credentials.
- Select your event campaign and click on the Install Widgets option to copy the Login Widget code snippet.
- Paste the code snippet at the starting point of your registration flow (welcome page).
- Replace the http://www.insert_your_next_page_where_users_should_land.com with the URL of the next page in your registration flow: presumably the RegFox page.
Important: All registration traffic must flow through the Login Widget; remove additional "Register" links or buttons from the page where Login Widget is installed.
Step 2: Add Confirmation and Social Widget to RegFox
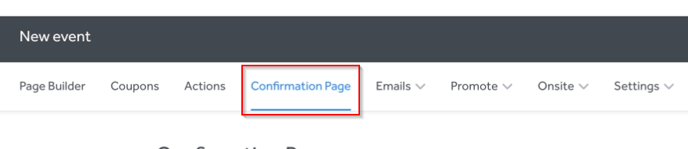
- Open your RegFox Page Builder for your campaign.
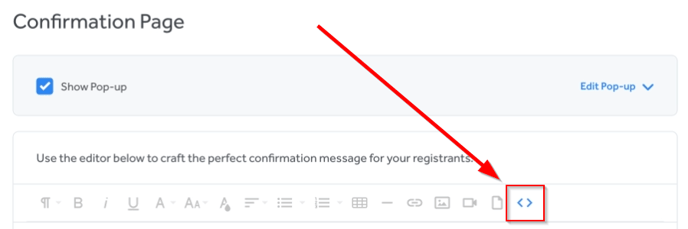
- Navigate to the Confirmation Page tab.
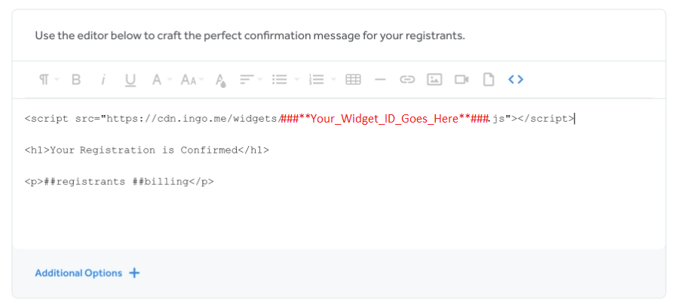
- In the text editor, click on the Code View button, which should be the last button in the top row of options. It will look like two arrows facing away from one another: < >.
- Copy and paste your code snippets from InGo admin for both the Confirmation and Social Widgets. We recommend putting these at the very beginning or very end of the editor content to help make it easy to refer back to these later.
- Click on the Code View button once complete, and the options to Save and Publish your page will appear in the top-right corner of your screen.
Step 3: Configure the Social Widget through InGo Admin
- Navigate to your Widget Configuration page for your Social Widget.
- On the edit page for your Social Widget, under the General tab, click the checkbox for the Allow preconfirm mode in popup. Currently, InGo widgets cannot be embedded on RegFox pages so these must appear as pop-ups instead.

- If not using the Login Widget, we recommend also enabling Allow post preview for preconfirm mode, as this will allow users to first be prompted to share via social media when reaching the Social Widget.
- Don't forget to save!
And that's it, you've installed InGo!
Please contact support@ingo.me with any questions.