This article covers two possible ways of integrating InGo with Bizzabo.
1. Basic installation
- in this method, InGo widgets are being installed by embedding widget codes directly into Bizzabo. There are three widgets in total that need to be installed. *Requirement: your setup/theme in Bizzabo, must have the possibility to embed additional HTML code to one of the (either a home page or a separate landing page) pages at the start of the registration flow
- Login Widget
- Using your InGo account, grab the "Generic Script-only" code for this widget in InGo admin, by following the steps from this article. , and embed on a Bizzabo page.
Once embedded, grab a URL of the next page in your registration flow and incorporate it into the Login Widget script for redirection. The installed and updated Login Widget script should look similar to the following dummy example:
<script src="https://cdn.ingo.me/widgets/ED327751D5E54C57988E5854A6DE2E3E.js" data-ingo-manual="https://events.bizzabo.com/463494/page/2527829/register"></script>
^^^ the code above is just a dummy example, do not use it for your installation. - Confirmation Widget and Social Widget
- In InGo admin, find the codes for these widgets by selecting the "Generic IFRAME" installation. These codes should look similar to the following dummy example:
<iframe src="https://app.ingo.me/widgets/iframe?widget_unique_id=C7798F1BD8C64E8E9E39661A096BADB2" style="border:0"></iframe>
<iframe src="https://app.ingo.me/widgets/iframe?widget_unique_id=ACDFA9207A35466593C0951D3A2D5D59" style="width: 100%; height: 600px;" frameborder="0"></iframe>
^^^ the codes above are just a dummy example, do not use those for your installation.
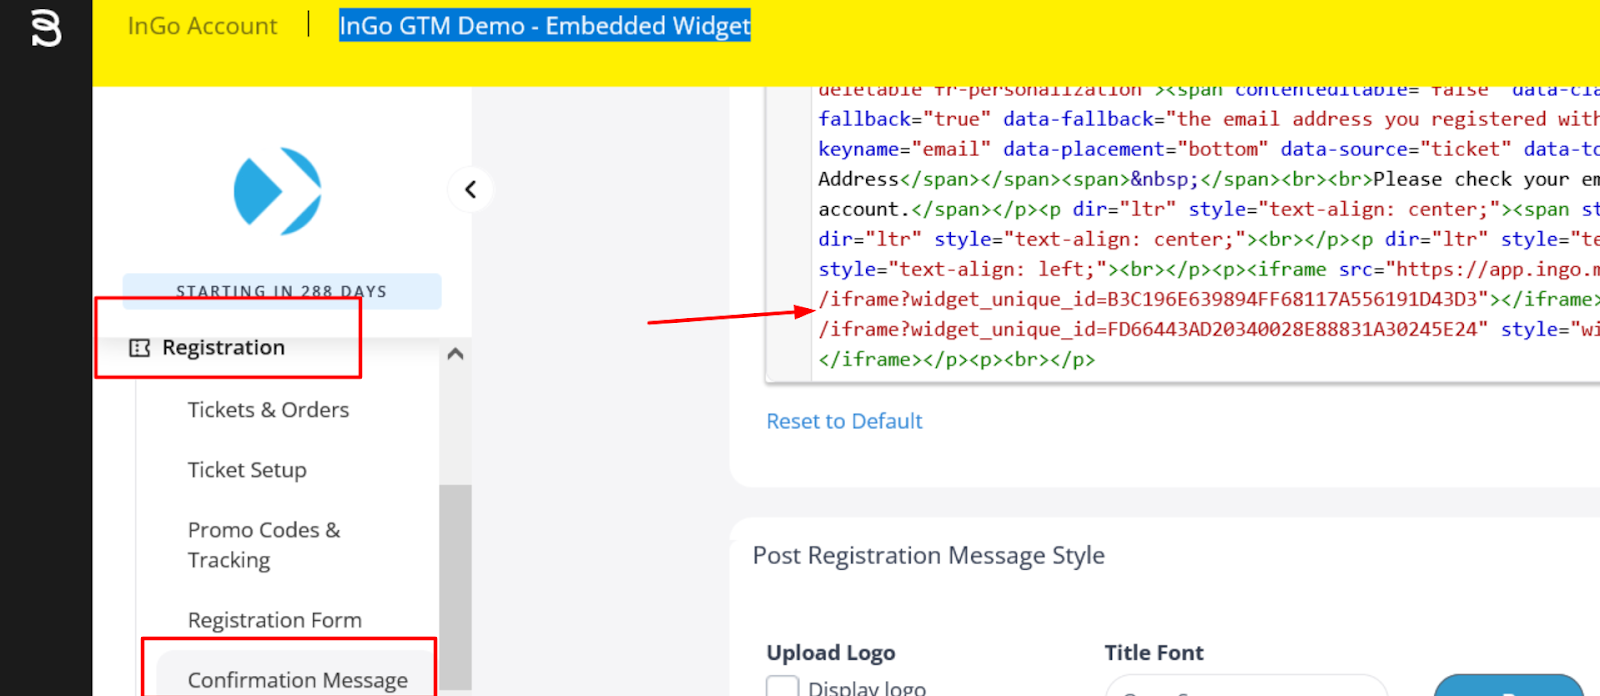
- In the Bizzabo home dashboard, select "Registration" from the left-hand side and then click on the "Confirmation Message" option,
paste the Confirmation and Social Widget codes into this field and save the change.
That's it, by following the steps above, you've successfully integrated InGo using the Basic Installation method!
2. Custom Installation
- This method should be used in case you don't have the possibility to embed additional HTML code to your Bizzabo pages. There are three widgets in total that need to be installed.
*Requirement: A Google Tag Manager account and the Bizzabo native button for registering.
Basically, in this installation, we'll be adding widget codes into a Google Tag Manager container and connect it with Bizzabo.
- Log into your existing Google Tag Manager account or create an account.
- After creating an account or logging into your existing one, select "Variables" from the left-hand side in the Workspace dashboard and click on the "New" button in order to create a new one that's needed.
For Variable Configuration, choose "Data Layer Variable" under "Page Variables", just fill out the "Data Layer Variable Name" field with the following:
buyerEmail
and click on the "Save" button. Repeat the Variable steps above, in order to create an additional variable and use the: buyerName for this additional one, instead of buyerEmail.
- Login Widget
- Using your InGo account, grab the "Generic Manual" code for this widget in InGo admin, by following the steps from this article.
- From the left-hand side, within the Google Tag Manager Workspace dashboard, select "Tags" and click on the "New" button in order to create a new tag. Choose "Custom HTML" as a tag type and paste the Login Widget code that you grabbed from InGo admin.
Once completed, the pasted code should look similar to the following example:
<script src="https://cdn.ingo.me/widgets/ED327751D5E54C57988E5854A6DE2E3E.js" data-ingo-exec="false"></script>
		    <button class="container" type="button">Run</button>
		    <script>
		    InGo.ingoWidget({
		      "widgetId": "ED327751D5E54C57988E5854A6DE2E3E",
		      "manual": "http://www.insert_your_next_page_where_users_should_land.com",
		      "target": ".container"
		    });
		    </script>
The added Login Widget code should be updated with a URL of the next page in your registration flow and an HTML div class ID of the Bizzabo button for registering:
- replace the dummy redirection URL example http://www.insert_your_next_page_where_users_should_land.com/
with a real URL for redirection and replace the ".container" part with the ".register-btn-holder" which is the div class ID of the native Bizzabo button for registering and save the change.
- Below the "Tag Configuration" field, click on the "Triggering" field in order to create a trigger for this tag. Choose "Page View" as a trigger type and select "Some Page Views" for firing a trigger.
Then, configure it using the following values:
1. Page URL
2. equals
3. add a URL of the Bizzabo page where you'd like to have the Login Widget installed and where the Bizzabo button for registering is placed
and click on the "Save" button. - Confirmation Widget and Social Widget
From the left-hand side, within the Google Tag Manager Workspace dashboard, select "Tags" and click on the "New" button in order to create a new tag. Choose "Custom HTML" as a tag type, copy and paste the following code template into the tag field:
<script>
var fullName = .split(' '),
firstName = fullName[0],
lastName = fullName[fullName.length - 1];
body = document.getElementsByTagName('body')[0];
var cw = document.createElement('script');
cw.setAttribute('type', 'text/javascript');
cw.setAttribute('data-ingo-attendee.email', );
cw.setAttribute('data-ingo-attendee.first-name', firstName);
cw.setAttribute('data-ingo-attendee.last-name', lastName);
cw.setAttribute('src', 'https://cdn.ingo.me/widgets/PLACE-UNIQUE-CONFIRMATION-WIDGET-ID-HERE.js');
body.appendChild(cw);
var sw = document.createElement('script');
sw.setAttribute('type', 'text/javascript');
sw.setAttribute('src', 'https://cdn.ingo.me/widgets/PLACE-UNIQUE-SOCIAL-WIDGET-ID-HERE.js');
var e = document.querySelector("body");
e.appendChild(sw);
</script>
update the code template with unique InGo widget IDs that can be found in InGo admin and save the change.
- Click on the "Triggering" field below and choose "Custom Event" as a trigger type. Fill out the "Event name" field with the following value: registrationComplete
and select "All Custom Events" below, and save the configuration.
- Within the Google Tag Manager workspace dashboard, click on the "Submit" button in the top right corner in order to make the container live and then Publish.
- Copy the Google Tag Manager container ID that is located near the "Submit" button. Go into your Bizzabo home dashboard, select "Marketing & Web", then choose "Tracking Pixels" and paste the ID into the Google Tag Manager field and click on the "Save" button.
That's it, by following the steps above, you've successfully integrated InGo with Bizzabo, using the Custom Installation!
- If you need any additional assistance with the Custom Installation, please reach out to support@ingo.me, to arrange a call during which the InGo support team will walk you through the entire process and help go live with the first installation.
