There are several ways to access your InGo install scripts, but starting from the Growth Report is usually the simplest path because it takes you directly to the install for your event.
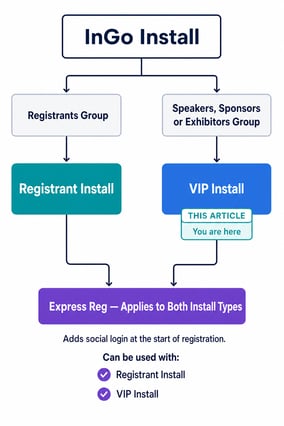
Before you begin, identify which registration journey you're working with. This determines which install path you should use:
- Speakers, Sponsors, or Exhibitors → VIP Install
- General Attendees → Registration Install
- Express Reg → Can be used with all groups
An event may use more than one install type. For example, you might have a Registration Install for general attendees, a VIP Install for exhibitors registering through a separate form, and Express Reg at the beginning of one or both registration journeys.
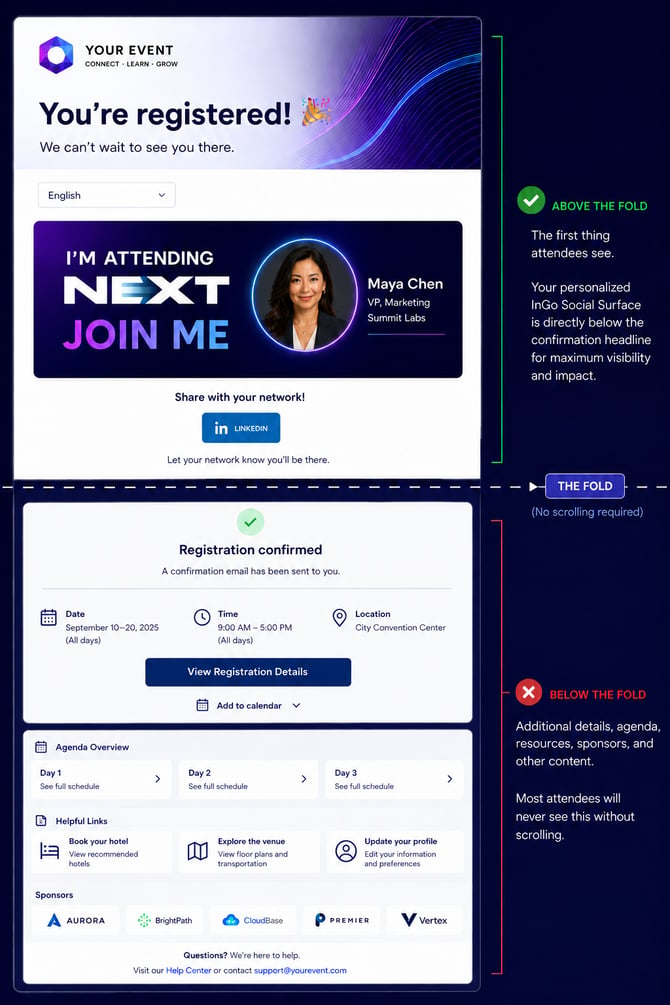
PRO TIP: Plan your install early. Give yourself enough time to complete your InGo Install and launch it before registration goes live. Be intentional about the registration experience, including placing your Social Surface near the top of the confirmation page. Engage as many participants as possible during registration, when their motivation and excitement are at their highest.
Before You Begin a VIP Install
Before starting your VIP Install, make sure you have:
- An Event-level Group for your VIP participants — [how to]
- Posting Graphic & Text configured for your VIP Group — [how to]
- Access to the VIP registration provider, with permission to add JavaScript or HTML
- Access to the applicable VIP registration pages, including the registration form and confirmation page
Your Posting Graphic & Text controls the personalized content participants will see and share from the Social Surface on the confirmation page.
Before you begin, review these best practices:
If someone else manages your VIP registration platform, share this checklist and the platform-specific installation instructions with them before you start. It'll save a round trip once you're mid-install.
Starting From the Growth Report
Log in to admin.ingo.me and you'll land on the Growth Report. You can begin your VIP Install directly from here:
- Navigate to the Growth Report.
- Locate your community and event.
- Locate the VIP Install prompt.
- Select the appropriate VIP Group for the registration journey you're installing.
- Select your Registration Provider.
- If your provider is listed, select it to view the provider-specific installation scripts and instructions.
- If your provider is not listed, use the applicable standard installation option and follow the standard installation instructions. [how to]
- Copy the scripts provided for your VIP registration journey.
- Paste the scripts into the appropriate pages in your Registration Provider.
Note: A VIP Install is intended for Speakers, Sponsors, Exhibitors, Partners, and other VIP participants using a VIP registration journey. If you're installing InGo on the main registration journey for general attendees, use a Registration Install instead. To add InGo at login, use Express Reg.
How This Differs From Other Install Types
A single event can use more than one InGo install type. The right install depends on the registration journey and audience you're working with.
VIP Install
Supports registration journeys for Speakers, Sponsors, Exhibitors, Partners, and other VIP participants, particularly when they use a different form, site, platform, or confirmation page from general attendees.
A single event may also have multiple VIP Groups or VIP registration journeys depending on how different participant types register.
Registration Install
Supports the main registration journey used by general attendees. It connects InGo to the registration experience and confirmation page.
→ Navigating a Registrant Install, Starting from the Growth Report [how to]
Express Reg
Adds InGo to the beginning of the registration journey, allowing participants to authenticate through a supported social network before completing registration.
Express Reg can be used alongside a Registration or VIP Install.
→ Installing Express Reg [how to]
What Success Looks Like
Before taking your VIP Install live, test the complete VIP registration journey from the participant's perspective.
A test participant should be able to:
- Complete the correct VIP registration journey successfully
- See the Social Surface prominently near the top of the confirmation page
- See the correct personalized Posting Graphic & Text for their VIP Group
- Share the event to LinkedIn from the Social Surface
- Complete the sharing experience successfully
If you have separate registration journeys for different VIP Groups, test each applicable journey to make sure the correct group, content, and Social Surface experience appear.
If you're also using Express Reg, test that experience separately as part of your end-to-end testing.
Always run the complete VIP registration journey before publishing. See Test Your InGo Installation for the full testing procedure.