This article describes the process of setting up your Login Widget to appear as a pop-up on the screen as opposed to being embedded on the page. This can also be described as displaying your login widget as a modal, dialog box, popover, or lightbox.
Having your Login Widget appear in a pop-up offers certain advantages like minimized setup and styling on your page, due to the widget not being embedded directly.
Having your Login Widget appear in a pop-up does have some potential drawbacks to consider, such as users with pop-up blockers may not see the widget initially unless they allow pop-ups on the page. While most modern browsers allow these types of pop-up dialog boxes to appear despite pop-up blocks, individuals with more robust and restrictive settings may still not see the pop-up initially.
Getting Started
First, navigate to your Widget Configuration page for the Login Widget that will be updated. Next, click on the Display tab. You will see a variety of options
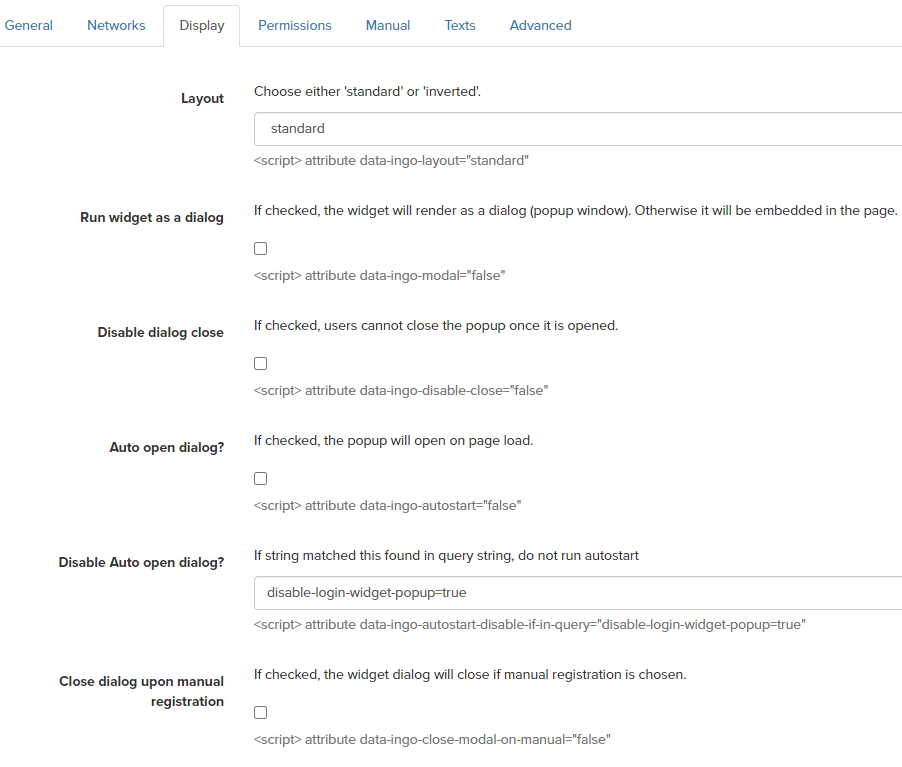
The options we want to focus on here are:
- Run widget as a dialog - When the Login Widget is generated on-screen, it will appear as a pop-up.
This must always be enabled for this type of workflow or the widget will be embedded on the page, and not appear as a pop-up.
- Disable dialog close - This will prevent users from moving onto the next step in registration until they have interacted with the Login Widget. This can be useful if this widget will be on the same page as a registration form and you want them to interact with the form afterwards.
- Auto open dialog? - For user journeys where the pop-up should not be triggered by something a user does, such as a button click, this setting will cause the pop-up to appear immediately when the page loads.
- Close dialog upon manual registration - Closes the login widget when a user does not select a social media option. This setting can be used when you have different registration journeys for social-using vs non-social users.
Types of Pop-Up Configurations
By using InGo's Login Widget as a pop-up, this enables flexible options on where this lives on your site. Please see the sections below on different ways this can be implemented.
Installing the Login Widget on a Form Page
In workflows where you may want this to appear on a form page, before a user fills out their registration information, the following settings are recommended:
- Run widget as dialog - enabled
- Disable dialog close - enabled
- Auto open dialog? - enabled
- Close dialog upon manual registration - enabled
In the script for the widget itself, the redirect URL should be set to the same page and have the following addition added to the end of it:
?disable-login-widget-popup=true
The entire script, with this addition, could look something like the example below.
<script src="https://cdn.ingo.me/widgets/##-WIDGET-UNIQUE-ID-##.js" data-ingo-manual="http://www.my-reg-site.com/same-page?disable-login-widget-popup=true"></script>
Installing the Login Widget to Pop-Up on a Button Click
In workflows where you want the Login Widget to appear after a user has clicked a button, the following settings are recommended:
- Run widget as dialog - enabled
- Disable dialog close - disabled
- Auto open dialog? - disabled
- Close dialog upon manual registration - disabled
In the script for the widget itself, the target should be set to a CSS selector that matches your desired button. For example, if the target button's HTML looked like this:
<button class="ingo-button">Click me to Register!</button>
Then your InGo code snippet could look something like this:
<script src="https://cdn.ingo.me/widgets/##-WIDGET-UNIQUE-ID-##.js" data-ingo-exec="false"></script>
<script>
InGo.ingoWidget({
"widgetId": "##-WIDGET-UNIQUE-ID-##",
"manual": "http://www.my-reg-site.com/same-page",
"target": ".ingo-button"
});
</script>
This type of install is a bit more complicated than other configurations, so our team can always assist with identifying this for you if need be.
Test Your Configuration
Before going live with new configurations, we recommend testing to ensure that your registrants experience a smooth registration without any hiccups. To test out this setting, please ensure that:
- The Login Widget pops up on the page as expected
- If setting this to trigger from a button click, that the widget only pops up when the designated button is clicked.
- If redirecting to the same page after using it, the Login Widget does not pop-up automatically.
- If using a Registration Widget in your installation, data gets autofilled when using a social login.
Please contact support@ingo.me with any questions.