This article describes the general process for installing InGo into a BigMarker webinar.
Requirements
To utilize all of InGo's functionality in your webinar's registration, we recommend using a BigMarker template that has the registration form embedded on the page, such as the Boom, Formal, or Cooper ones. As this may require a specific plan, we recommend reaching out to your BigMarker account manager if one of the templates above is not available to you.
On your BigMarker form, it is also recommended to have dedicated fields for First Name, Last Name, and Email address. This will allow for users who opt-in to registering with social to have their data auto-populated.
Getting Started
InGo widgets generally appear in three distinct steps through the registration process: A login or welcome page, a registration or form page, and then a confirmation or "thank you" page. On BigMarker, these three steps still take place, however the page setup is reduced to two pages: the Webinar Landing Page and the Confirmation Page.
Widget Scripts
As of October 2023, a dedicated option to retrieve widget scripts for BigMarker is not available within InGo's admin portal. This code is instead provided later in this article.
At certain points in the article, you will be asked to replace the placeholder ID numbers with your event's widget IDs. For assistance with locating your widget IDs, please see this article.
You will want to copy the IDs for all four InGo widget types and save these for later.
Adding the Login and Registration Widgets
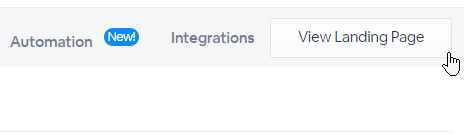
Starting from the BigMarker Manage Webinar screen, click the View Landing Page button in the top-right of the page.
Once on your Landing Page, a few options will appear in the top bar of your page. Click on the Edit Page button on the right-hand side.

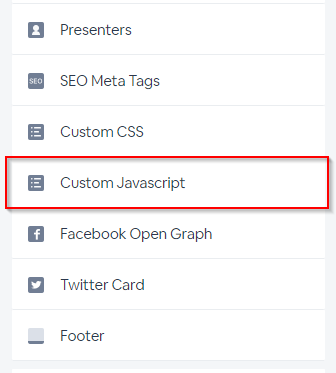
This will open up multiple Content options to explore on the left-hand side of the page. We want to select the Custom JavaScript option here to add our first code snippet, which will add both the Login and Registration widgets to the BigMarker Webinar.
The below code can be copied and pasted into the Custom JavaScript section that was opened. Please replace all instances of #LOGIN-WIDGET-ID## with your Login widget ID and all instances of #REGISTRATION-WIDGET-ID## with your Registration widget ID.
data-ingo-texts.en['label.button.linkedin']="Register with LinkedIn" data-ingo-texts.en['label.button.facebook']="Register with Facebook"
data-ingo-texts.en['label.button.manual']="Register with Email"></script>
<script src="https://cdn.ingo.me/widgets/##REGISTRATION-WIDGET-ID##.js" data-ingo-exec="false" data-ingo-fields.user.first-name=".new_member_first_name" data-ingo-fields.user.last-name=".new_member_last_name" data-ingo-fields.user.email=".new_member_email"></script>
<script>
let hideLW = window.location.search.includes("hideIngoLW");
let redirectURL = window.location.href + "?hideIngoLW";
let loginID = "##LOGIN-WIDGET-ID##";
let regID = "##REGISTRATION-WIDGET-ID##";
document.addEventListener('DOMContentLoaded', () => {
const confirmationBox = document.getElementById('js-registration-confirmation-box');
let confirmationHidden = window.getComputedStyle(confirmationBox).getPropertyValue('display') === 'none';
if (!hideLW && confirmationHidden) {
InGo.ingoWidget({
"widgetId": `${loginID}`,
"manual": `${redirectURL}`,
"target": '#js-registration-form-box',
});
} else if (confirmationHidden) {
document.getElementById('js-registration-form-box').style.display = 'block';
InGo.ingoWidget({
"widgetId": `${regID}`,
});
}
});
</script>
Once the code has been added and updated, click on the Save button for the Custom JavaScript section, along with clicking the Save button in the top-right of the page to update the page with your latest changes.
Adding the Confirmation and Social Widgets
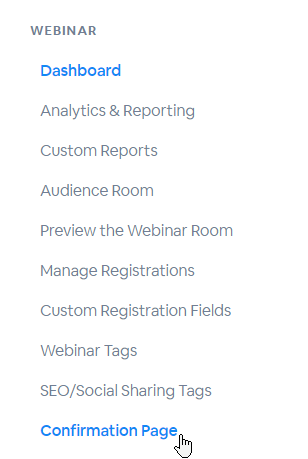
To enable your webinar attendees to share your event via social media, we'll need to add InGo's Confirmation and Social widgets to the Confirmation page. Navigating back to the Manage Webinar page, click on the Confirmation Page option that is available in the left navigation.
On the Confirmation Page, we'll want to first click on Sharing Options, and then uncheck the Show Share With Friends option. This will remove BigMarker's default social sharing option to avoid confusion between on attendees on which option to use.
Next, click the back button to return to the full list of options. Under the Other Options section in the left-navigation, click on Tracking Code. In the field that appears, enter the code below. As we did for the first two InGo widgets, we will want to replace ##CONFIRMATION-WIDGET-ID## and ##SOCIAL-WIDGET-ID## with the widget IDs for the confirmation and social widget, respectively.
<style>
[class^=rc-section-]>*{text-align:center}.rc-main>[class^=rc-section-]:last-child a{margin:0 auto}.rc-full .rc-main{max-width:1200px}.ingo_community_widget{width:100%!important;max-width:700px!important;margin:40px auto 0!important}.ingo_community_widget_post_form .ingo_community_widget_post_preview_container,.ingo_community_widget_post_form .ingo_community_widget_post_preview_container .ingo_community_widget_post_form_fields .ingo_community_widget_post_form_group,.ingo_community_widget_post_form .ingo_community_widget_post_preview_container .ingo_community_widget_post_form_fields .ingo_community_widget_post_form_group .ingo_community_widget_post_form_text,.ingo_community_widget_post_form_small .ingo_community_widget_post_preview_container .ingo_community_widget_post_form_group .ingo_community_widget_post_form_text{height:100%!important}.ingo_community_widget_post_form .ingo_community_widget_post_preview_container .ingo_community_widget_post_form_fields{flex:1!important}.ingo_community_widget_post_preview_container .ingo_community_widget_post_form_fields .ingo_community_widget_post_form_group .ingo_community_widget_post_form_text{background-color:#f7f7f7}
</style>
<script>
document.addEventListener('DOMContentLoaded', () => {
const targetContainer = document.querySelector('.rc-section-1');
let ingoTarget = document.createElement('div');
ingoTarget.id = "ingo-target";
targetContainer.appendChild(ingoTarget);
let confirmID = "##CONFIRMATION-WIDGET-ID##";
let socialID = "##SOCIAL-WIDGET-ID##";
let cwScript = document.createElement('script');
cwScript.src = `https://cdn.ingo.me/widgets/${confirmID}.js`;
document.body.appendChild(cwScript);
let swScript = document.createElement('script');
swScript.src = `https://cdn.ingo.me/widgets/${socialID}.js`;
swScript.setAttribute('data-ingo-target', '#ingo-target');
document.body.appendChild(swScript);
});
</script>
Once this code has been added, don't forget to click Save & Exit in the top-right corner of the page. The changes will not visually take effect until you return to the Manage Webinar page and re-enter the Confirmation Page.
Testing Your InGo Installation
Please refer to the sections below for testing your individual widgets. If anything is not working as expected, please reach out to support@ingo.me.
Login Widget
When testing the Login widget, the following checklist can be used to confirm if this has been set up correctly.
- Does my widget appear on the page as expected?
- Does clicking the LinkedIn "Register" button, or another social option, properly allow you to authenticate with your credentials?
- After using the login widget, either via the social or email option, does the page reload and display the registration form?
Registration Widget
For testing the Registration widget, you will need to have authenticated with a social media account through the Login widget. Please note that the Registration widget does not have a visual UI on the page.
- When the registration form is displayed, are the following fields auto-populated?
- First Name
- Last Name
- Email Address
Confirmation and Social Widget
The Confirmation and Social widgets work together on the Confirmation Page to allow users to share to social media and help promote your experience.
For testing the Confirmation widget, please reach out to our support team to verify reporting data is properly being tracked on the backend.
As for the Social widget, the following checklist can be used to test this:
- Does the widget appear on the page when reaching the Confirmation Page?
- If choosing to post on social media, does your post properly appear on your account's social feed?
- If social authentication was not used on the Login widget, are you able to authenticate socially at this step and post?
- Are you able to invite anyone via email? This can be tested by sending an email to yourself.
- If Meetings functionality is enabled: Are you able to request meetings with other participants?
For any questions or assistance with setting up and/or testing your BigMarker integration, please contact support@ingo.me.