Events that achieve stronger referral performance and registration growth typically follow the best practices below. Use this guide to make sure InGo widgets are installed correctly, placed where registrants will see them, and launched early enough to capture the full registration journey.
1. Install InGo Across the Full Registration Journey
InGo works best when widgets are installed at both the beginning and end of registration. A complete installation includes all four InGo components across the registration flow:
|
Registration Page |
Goal |
Widget Type |
|
First page of registration |
Increase advocacy during registration and speed up sign-in. |
Login Widget |
|
Form page for data collection |
Speed registration with auto-complete |
Registration Widget |
|
Confirmation & “thank you” page |
Confirm registration and drive sharing after registration is complete |
Confirmation Widget & Social Surface |
⚠️ Critical: A missing Login Widget reduces adoption by approximately 40%. When your registration provider supports it, place the Login Widget at the start of registration, above the fold, so it is immediately visible to registrants.
2. Place the Social Surface "Above the Fold"
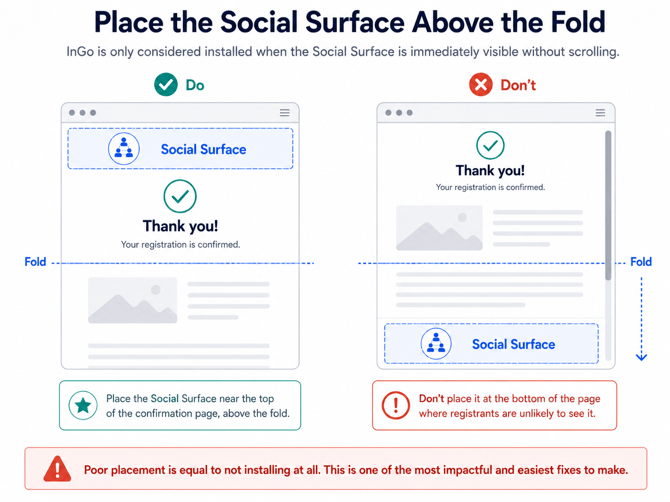
✅ Do: Place the Social Surface near the top of the confirmation page, above the fold.
❌ Don't: Place the Social Surface at the bottom of the page or below other confirmation content where registrants may not see it.
Poor Social Surface placement can perform the same as not installing it at all. This is one of the most impactful and easiest installation issues to fix.
Important: All widget code must be placed in the page body, not the header or footer.
3. Retrieve Your Widget Scripts from the InGo Admin
To get the correct widget scripts for your event:
- Log into the InGo Admin
- Navigate to your event → Groups → Install Widgets
- Select your registration provider (e.g., Cvent, Visit by GES, Swoogo, etc.)
- Follow the on-screen instructions for each widget
📄 Need help finding your scripts? See: Locating Your Widget Scripts
4. Upload Your Event Graphics Before Going Live
The Social Surface requires a posting graphic to display correctly. If no image is uploaded, the widget will show a spinning wheel or blank preview.
How to upload your social post graphic
Do this before installation is complete — the Social Surface cannot function properly without it.
📄 Inspiration:Posting Graphic Design Best Practices
5. Install Early - Before Registration Opens
InGo should be live when registration opens, or at least 90 days before your event. Every registrant who passes through before InGo is installed is a missed advocate.
Common timing failures:
- Installing after registration has already been open for weeks
- Waiting until close to the event date to begin the installation process
- Assuming installation can be completed quickly when a third-party registration platform or technical team is involved.
- Not allowing enough lead time for ticket-based installation processes.
If your registration provider requires support from their technical team, start the installation process as early as possible.
6. Check Your Installation If Adoption Rates Are Low
If you notice a lower-than-expected adoption rate or participant count, a broken or misconfigured widget installation is often the cause. Common issues include:
- Login Widget missing or removed from the start of registration.
- Confirmation Widget or Social Surface missing from the confirmation page.
- Social Surface placed below the fold.
- VIPShare link used instead of the Login Widget.
- Registration page updates that removed or broke the widget embed.
- Widget code placed in the header or footer instead of the page body.
- Event graphics missing from the Social Surface.
If you suspect an installation issue, contact support as soon as possible, especially if your event is within 90 days. Resolving issues early helps maximize the number of registrants captured and advocates generated.
Need Help?
- 📧 Support: support@ingo.me