Overview and Guide
VIP Notifications are InGo’s built-in email templates designed to help your participants quickly and easily share a post to promote their attendance.
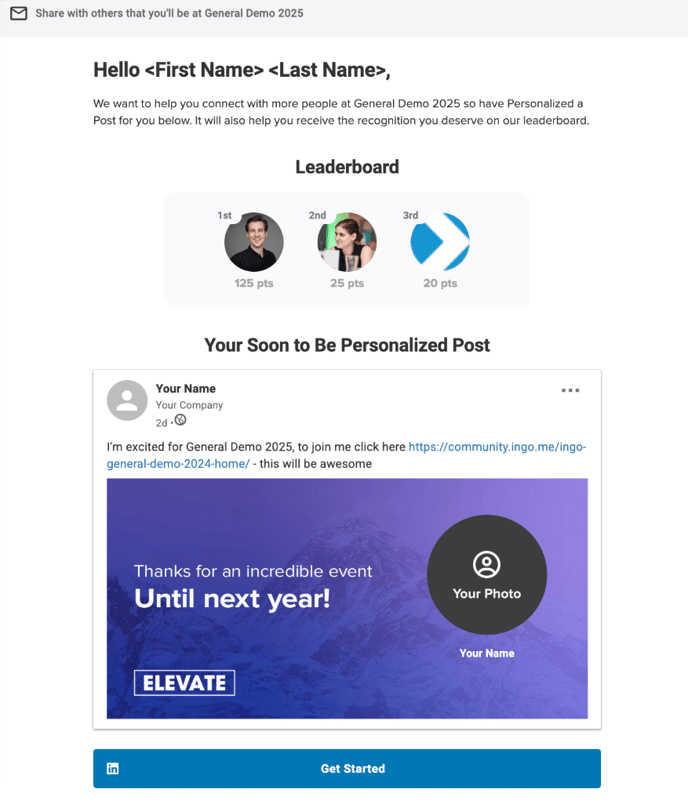
Recipients receive a simple email featuring a preview of what their social post can look like. From there, they click the single call-to-action button, are brought to InGo's landing page, and can then share out their personalized post in a few short clicks.
The following video steps through this functionality at a high level.
How it Works
You can begin setting up your VIP Notifications by first visiting your InGo event page and then clicking the Manage Emails button in the top-right.
On the Manage Emails page, you can review your InGo Groups, upload more participants, edit the email content, view a live-rendered preview with real-time updates, and set up your scheduling campaign. Let's review each of these in turn below.

Audience Filters
This section allows you to view all of your InGo Groups that have been created for this event. Under each Group name you'll see the type of emails set up along with the number of users currently assigned to the Group. If more users need to be added, simply click on the Upload Participants button at the bottom of the section to add your .csv or .xlsx file containing that set of data.

As with other areas in your InGo event that you can upload users, your spreadsheets can include users previously uploaded. Our system will only add net-new users and update existing ones if any data has changed.
Please note that individuals can only be added to a single InGo Group. If a participant is being uploaded into one Group, while already being assigned to another, our system will update their Group assignment during this process to the most recent assignment.

Clicking on a Group will also open up that specific Group's unique configuration, which will allow you to set up unique campaigns for each type of user, with language relevant to their role in your event.
InGo does include default language for each Group but we highly encourage clients to dive in and craft language that resonates with the audience attending the event.
Email Types and Editing Your Content
This section allows you to edit your email content based on what is enabled. At the top of the section, you'll see two tabs: one for VIPShare and one for Meetings.
- VIPShare Emails - these emails encourage your users to post using InGo.
- Meetings Emails - these emails encourage your participants to schedule meetings with one another while at the event.
Meetings is an older InGo feature that is disabled by default on most InGo events so these will typically not send out. If you would like to enable/disable these emails, or would like to learn more about Meetings functionality, please contact your InGo Customer Success Manager.

On the email itself, there are a few customization options you can adjust right from this screen. Outside of the main content itself such as Subject, Headline, and Body, you can also toggle on/off the email itself (for the Group) and the Leaderboard which is our gamification tool to spur more engagement.
Preview Your Email
The third section on this page allows you to view a live preview of your email from a user's perspective. Any content you're updating on the email will immediately reflect in this real-time preview, so you can tinker with the verbiage until you've got it just right!
Scheduling and Sending Emails
The last section on this page is located in the bottom-right of the screen and contains three buttons: Test Email, Schedule, and Send Emails.
Clicking on the Test Email button will open a pop-up that lets you send a test to a specific email address.

At this time, when sending a test email to an address it will send an email for each email type for each InGo Group in that event. This is intentional so you can review each one in kind. We do not currently support sending single test emails but plan on releasing this functionality in the future.
Clicking on the Schedule button will open a menu where you can customize your sending campaigns, both for the event overall (All Groups) and at the individual Group level. You can also set the time in which these emails are sent, however this setting is global and cannot be customized per email send.

By default, our system provides a schedule of eight different dates when an event is created which can be updated as needed.
Finally, the Send Emails button allows for you to immediately send out an email to a Group (or Groups) of your choice. Clicking this button will open a side menu in which you can click a Send Now button for the Group you would like.

There is no secondary confirmation prompt when using the Send Now button. Please be sure you are ready to send your VIP Notifications this way before clicking the button as these cannot be recalled once sent.
Receiving a VIP Notification
InGo VIP Notifications are only sent to participants who have not yet shared all available posting options. For social posts with a single option, a user who has previously shared this will not receive any additional emails for that Group unless new posting options are added.
Any changes to the original post configuration settings will reset this requirement and allow users who may have posts previously to receive these again. These changes can include things like adding additional options, updating the graphics, or changing the posting text.
If multiple posting options are available, the system sends a notification for the first unshared option. After they share it, the next notification will promote another option.
Sending Emails From your Domain
All InGo VIP Notifications, by default, are sent from our domain: info@ingo.me. If you would instead prefer the sending address to be updated to your own, this can be configured across your entire InGo community for all of your events. This does require some customization so your organization's IT team and ours can work together to set this up.
To get started with this process, please contact your InGo Customer Success Manager to request this change and provide the email address you would like to use instead.
That’s it!
With VIP Notifications, your participants can easily help spread the word about your event — all with minimal effort on your part.
Please contact support@ingo.me with any questions.