
If VIP Notifications went out before you expected, it's almost always because of the default schedule. To help every event reach more advocates, InGo schedules VIP Notifications automatically when an event is set up. This article explains how that works and how to take control of it.
How the Default Schedule Works
- Each new event gets a default schedule of 8 sends: 90, 75, 60, 45, 30, 15, 7, and 1 day before the event start date.
- The default schedule is set under All Groups, so it applies to every group in the event, including groups you add later.
- If the event is set up with less than 90 days to go, only the remaining dates are added. For example, an event set up 55 days out gets 5 sends.
- Your organization can change these default days, or turn the default schedule off for new events, in Growth Reports (see Managing VIP Notification Requirements from Growth Reports).
- On each send date, emails go to every group whose VIPShare Emails toggle is on and that has a post graphic, at the time set in Emails Send At.
- Only participants who haven't shared yet and haven't unsubscribed receive the email.
IMPORTANT: Sent emails can't be recalled. Review the schedule as soon as your event is set up, especially if participants are syncing from your registration platform.
Review Your Schedule
- On the Event Summary page, click Manage Emails.
- Click Schedule at the bottom of the page.
- Click All Groups on the left. Dates here send to every group in the event.
- Click each group to see any dates scheduled for that group only.
- Check Emails Send At and the timezone shown next to it.
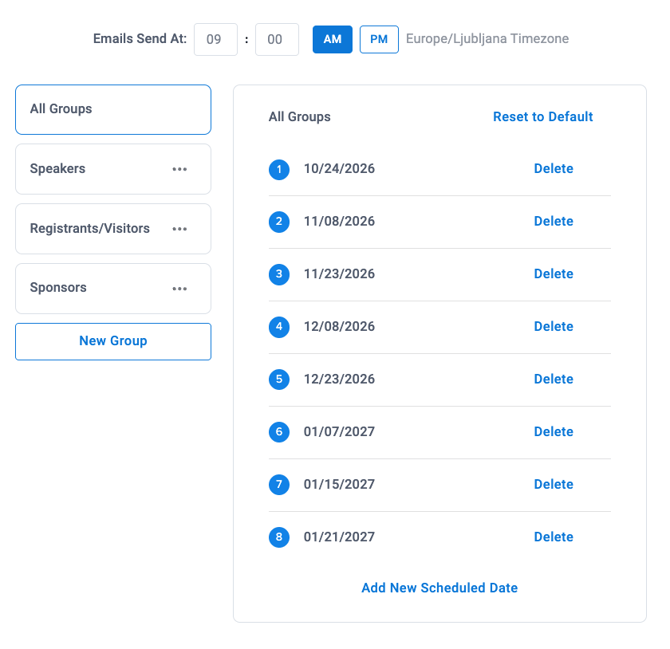
Change the Schedule
- Add a date: click Add New Scheduled Date.
- Remove a date: click Delete next to it.
- Start over: click Reset to Default to restore your organization's default schedule.
- Click Save when you're done.
NOTE: Your organization may mark some send days as required in Growth Reports. You can remove any date that isn't required. If you remove a required date, the schedule won't save until it's added back for All Groups or for groups covering more than 50% of participants. See Troubleshooting VIP Notifications.
PRO TIP: Don't delete dates that have already sent. Past dates are your record of when emails went out.
Pause or Stop VIP Notifications
| If you want to... | Do this |
|---|---|
| Stop emails to one group | In Manage Emails, select the group and turn its VIPShare Emails toggle off |
| Stop emails to specific people | Move them to a suppression group. See How to Remove Participants |
| Pause all upcoming sends for this event | In Schedule, delete the upcoming dates under All Groups and each group. If required dates block you, turn off the toggle for each group instead, or contact your InGo admin |
| Stop default schedules for future events | Ask your Decision Maker to update the VIP Notification settings in Growth Reports (see Managing VIP Notification Requirements from Growth Reports) |
Frequently Asked Questions
Who received the email that went out?
Check the Groups table on your Event Summary page for counts by group (see How to Check if Your VIP Notifications Were Sent). For a list of individual recipients, contact InGo Support.
Can I see the exact email that was sent?
The email used the content set up for that group in Manage Emails at the time of the send. Open Manage Emails and select the group to review it.
Will anything else go out?
Only the dates listed in your schedule. If no dates are listed under All Groups or any group, no VIP Notifications will send.
I didn't set up any VIP Notifications last year. Why are they on now?
New events get your organization's current default schedule. If it was changed or turned on since your last event, the new event follows the new settings.