
Smart Personal Invites let attendees invite people they know to your event, straight from the InGo Social Surface. After registering, an attendee connects a contact source or uploads a list, InGo ranks their contacts by fit for your event, and they send a personal invitation in one click.
Before You Begin
- Smart Personal Invites are part of the Social Surface. Attendees see them wherever your Social Surface is installed.
- Invites are on by default. If your community turned Invites off before, they stay off until you turn them on.
- Only people who are participants in the event can send invites. Someone who opens a copied event link without registering can't send invites.
- Who can do this: users with the Admin or Community Manager role (Step 1), and anyone who can edit the event (Step 2).
How It Works
| Step | What the attendee does |
|---|---|
| 1. Connect | Connects HubSpot, Salesforce, Google, or Outlook, or uploads a CSV of contacts. |
| 2. Choose | Sees their contacts ranked by fit for your event and selects who to invite. |
| 3. Send | Reviews the subject and message you set, edits them if they like, and clicks Send Invites. |
InGo ranks contacts using a profile of the ideal attendee for your event, so the best-fit people appear first. Nobody is contacted until the attendee clicks send.
Each invitee receives a personal email from the attendee, addressed by name, with a link to your registration page.
Step 1: Turn Invites On or Off for Your Community
- In InGo Admin, click Growth Reports in the left menu.
- Click Execution.
- Click Motivate More Advocates.
- In Now Editing, select who the change applies to: Everyone (Default), Registrants, Speakers, Sponsors, or Exhibitors.
- Under Social Surface Enhancements, switch the Invites toggle on or off.
- Click Save.
- Choose how to apply the change:
- Save for New & Existing Events updates every event in the community.
- Save for New Events only affects events created from now on.
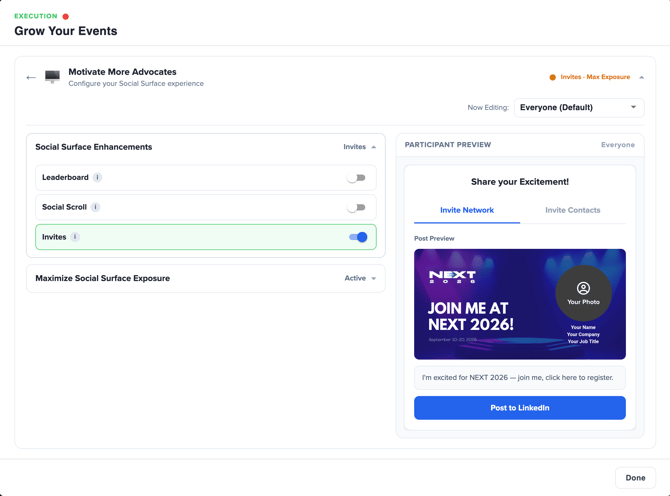
When Invites are on, the Participant Preview shows an Invite Contacts tab next to Invite Network.
If you change a setting for one audience, a Remove override button appears. Click it to make that audience follow the Everyone (Default) setting again.
Step 2: Set the Default Invite Message for a Group
Each group has its own default subject line and message. Attendees see this text pre-filled and can edit it before sending.
-
On your Event Summary page, find the group in the Groups table.
-
Click the ellipsis (...) next to the group name and click Edit.
-
On the General tab, scroll to Invite and make sure the toggle is on.
-
Edit the Subject Line and Text. Click the placeholder buttons to insert:
-
<Conference Name>: your event name.
-
<Invitee Name>: the first name of the person being invited.
-
<Conference URL>: the group's Post and Invite Target URL.
-
-
Check the Preview below the fields.
-
Click Save or Save and Close.
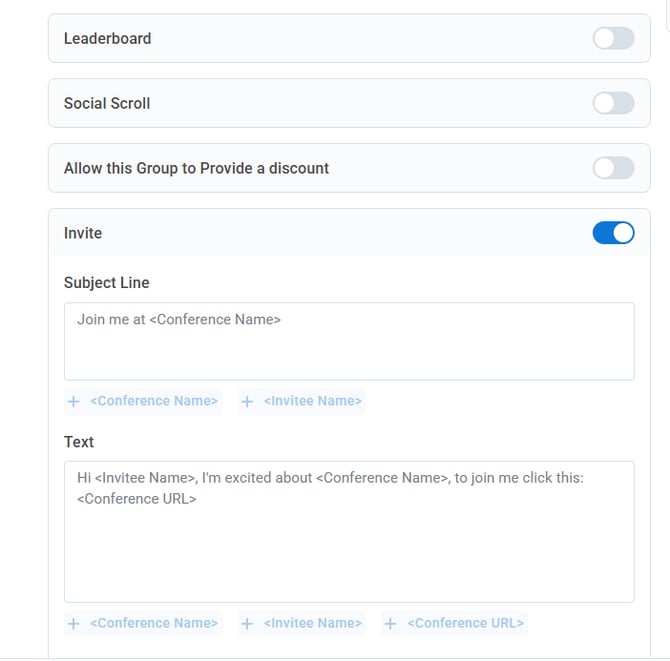
The default text is:
- Subject Line: Join me at <Conference Name>
- Text: Hi <Invitee Name>, I'm excited about <Conference Name>, to join me click this: <Conference URL>
NOTE: The link in the invite comes from the group's Post and Invite Target URL. It can include UTM parameters, so you can track invite traffic separately.
Saving the Growth Report setting with Save for New & Existing Events updates the Invite toggle on the matching groups. To turn invites off for one group only, switch off that group's Invite toggle. Attendees in that group won't see Invite Contacts.
What Attendees See
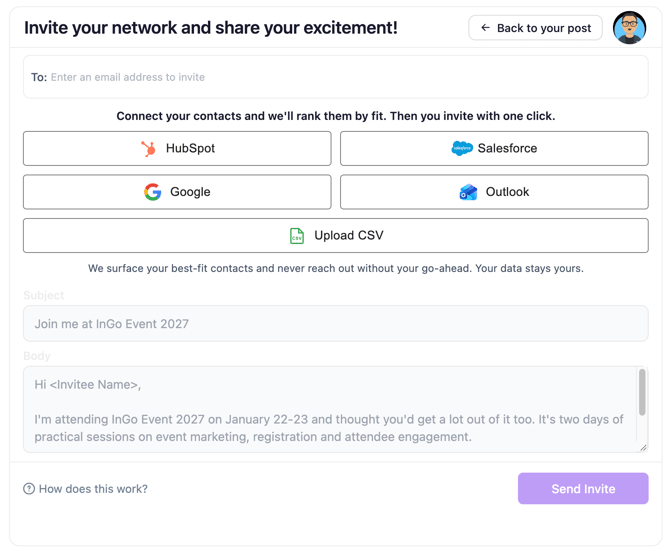
- After registering, the attendee sees the Social Surface, titled Invite your network and share your excitement!
- They click Invite Contacts.
- They choose a contact source: HubSpot, Salesforce, Google, Outlook, or Upload CSV.
- Connect a contact source: they sign in to that account and allow InGo to read their contacts. InGo only reads contacts and never changes them.
- Type an email address: they can also enter addresses in the To field without connecting anything.
- Upload CSV: they click Download Excel template if they need one, upload their file, confirm the column matching, review the rows, and click Import.
- Their contacts appear ranked by fit. Contacts they've already invited to this event are left off the list. They select the people they want to invite.
- They review the subject and message, edit them if they like, and click Send Invites.
- A confirmation appears, and the people they invited move to Previously invited.
The widget tells attendees: "We surface your best-fit contacts and never reach out without your go-ahead. Your data stays yours."
What Invitees Receive
Each invitee gets a separate email:
- The email comes from invites@ingo.me, with the attendee's name as the sender name.
- When the invitee replies, the reply goes to the attendee's own email address.
- The subject and message are the ones the attendee sent. <Invitee Name> is replaced with the invitee’s first name. If InGo doesn’t have a name, for example when the attendee typed the email address into the To field, the email starts with “Hi there”.
- The link takes the invitee to your registration page.
Check the Attendee Experience
After turning Invites on, check that:
- The Participant Preview in Motivate More Advocates shows the Invite Contacts tab.
- Each group you want to use has the Invite toggle on and a subject line and message you're happy with.
- On your live registration confirmation page, the Social Surface shows Invite Contacts after a test registration.
Frequently Asked Questions
Does it cost extra?
No. Smart Personal Invites are free for all InGo customers.
Can attendees edit the message before sending?
Yes. The subject and message you set are a starting point. Attendees can change both before they click Send Invites.
Does InGo email anyone without the attendee's approval?
No. Invites are only sent when the attendee selects contacts and clicks Send Invites.
Why can't I send invites when I open the event link myself?
Invites can only be sent by participants in the event. Register for the event, or test as a participant, then open the Social Surface.
Does sending invites make an attendee an Advocate?
Yes. Inviting through InGo counts as advocating for your event. See What is an Advocate?
Can I turn invites off for speakers but keep them for registrants?
Yes. In Motivate More Advocates, select the audience in Now Editing and switch Invites off for that audience only.
Can I change the "From" name or address on invite emails?
Invites come from invites@ingo.me, with the attendee's name as the sender name. Replies go to the attendee's own email address.
Will attendees see an "unverified app" warning?
Some contact sources may show an "unverified app" warning while InGo completes the provider's verification. It doesn't change how the feature works.
Related Articles
Questions or need help? Contact support@ingo.me or submit a request through Contact Us. For plan or contract questions, contact your InGo Account Manager.