
VIP Notifications are one of the biggest drivers of growth, but only if every event actually sends them at the right times. In Growth Reports, Decision Makers can set the rules once, and every event in the community follows them.
Who can do this: users with the Decision Maker role. This role is assigned by InGo. If you need help, contact your InGo Account Manager.
Who Controls What
| Role | Where | What they control |
|---|---|---|
| Decision Maker | Growth Reports > Execution > VIP Notifications | The email template, how many sends each event must keep, the default send days, and which of those days are required |
| Event Owner | Event Summary > Manage Emails > Schedule | Each event's actual schedule. They can add sends and adjust dates, but can't avoid the required sends |
Step 1: Open the VIP Notification Settings
- Go to Growth Reports in the left menu and select your community if you have multiple.
- Click Execution. The Grow Your Events window opens.
- The VIP Notifications row shows a quick status.
- Click the VIP Notifications row to expand it.
Step 2: Set the Required Sends Per Event
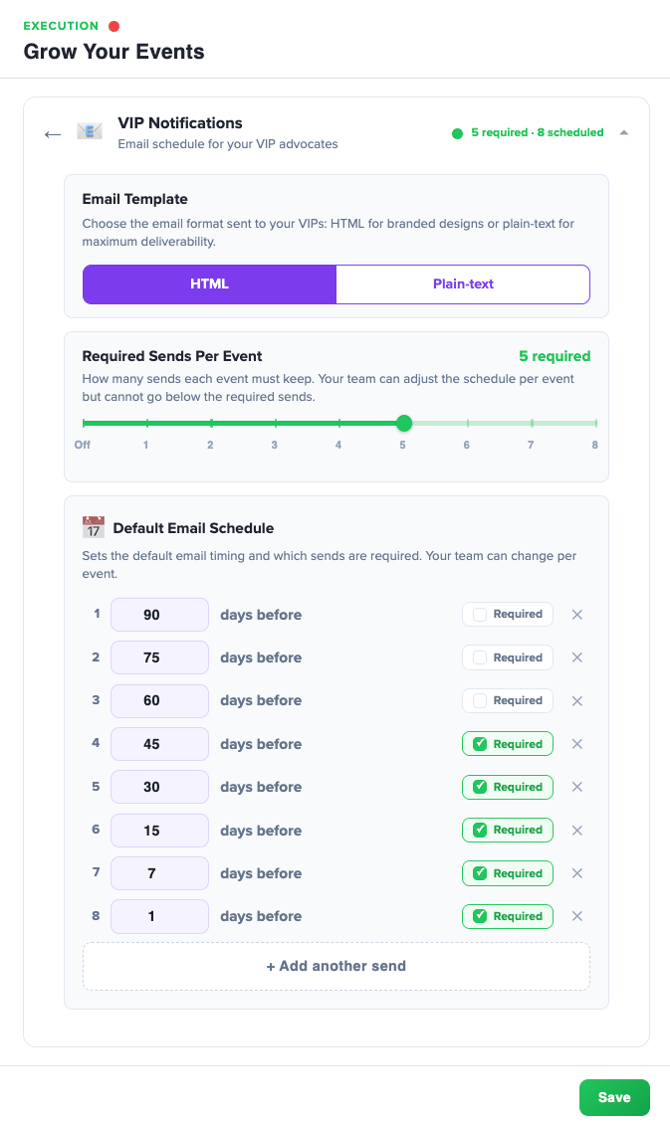
Use the Required Sends Per Event slider to choose how many sends every event must keep, from Off to 8. Your team can adjust each event's schedule, but can't go below this number. The status changes to match, for example 4 required · 8 scheduled.
Step 3: Set the Default Email Schedule
Under Default Email Schedule, set when emails go out and which sends are required. New events get this schedule automatically.
| Send is... | At the event level |
|---|---|
| Required | Must stay in the schedule for All Groups, or for groups covering more than 50% of participants. Otherwise the schedule won't save |
| Not required | Event Owners can move or delete it without any error |
- For each send, enter the number of days before the event. The default is 90, 75, 60, 45, 30, 15, 7, and 1.
- Check Required for the sends every event must keep. The number of required sends matches the slider. For example, with the slider at 4, you might mark 30, 15, 7, and 1 day before as required.
- Click + Add another send to add a date, or X to remove one.
PRO TIP: Mark sends close to the event as required, for example 15, 7, and 1 day before. This stops events from sending only early in the campaign and nothing in the final weeks, when sharing tends to perform best.
Step 4: Choose the Email Template
Under Email Template, choose the format for your events' VIP Notifications. This setting overrides the template chosen in each event's Manage Emails:
- HTML: branded design with the full post preview.
- Plain-text: looks like a personal email and gives the best deliverability.
Step 5: Save and Apply
- Click Save at the bottom of the window.
- In the Save Changes window, choose how to apply your changes:
- Save for New Events: only events created from now on use the new settings.
- Save for New & Existing Events: events that already exist are updated too.
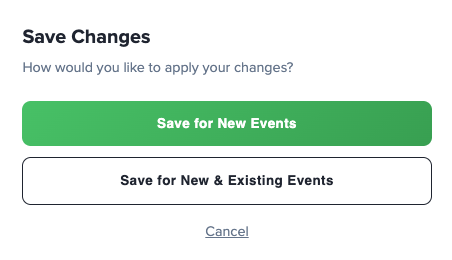
This window appears every time you save a change to your VIP Notification settings.
IMPORTANT: With Save for New Events, existing events keep their current schedule, requirements, and template. Choose Save for New & Existing Events to update already created events too.
How Requirements Work at the Event Level
- Each unique calendar date counts as one send, no matter how many groups receive an email that day.
- Event Owners can add as many extra sends as they like. Requirements are a minimum.
- If an Event Owner removes a required date, the schedule won't save. They'll see: "These required dates aren't scheduled for the majority of your participants: [dates]. Add them to All Groups, or to groups that make up more than 50% of participants." (see Troubleshooting VIP Notifications).
- Sends that aren't marked Required can be removed at the event level without an error.
- Reset to Default in an event's schedule restores the default schedule set here.
- Use Events Needing Execution in the same window to find active events that aren't fully executing your plan.
Turning VIP Notification Requirements Off
- If VIP Notifications aren't part of your plan, or Required Sends Per Event is set to Off, no requirements are enforced.
- Event Owners can still schedule VIP Notifications manually in each event's Manage Emails.
- Events that already have a schedule keep it. Review them in each event's Manage Emails.
IMPORTANT: Turning requirements off doesn't stop emails that are already scheduled. To stop upcoming sends for an event, delete the dates in that event's Manage Emails > Schedule, or turn off the VIPShare Emails toggle for its groups.
If you want to remove VIP Notifications from your Activation Plan altogether, contact your InGo Account Manager.
Parent and Child Communities
Growth Reports, including the Activation Plan and Execution, are managed on the parent community. Settings there apply to all of its communities, unless a community has been set up with its own plan by InGo.
- In the parent's Activation Plan, click + Add everywhere next to VIP Notifications to add it to every community's plan that isn't already using it. Once all communities have it, the button shows Planned everywhere.
- Contact your InGo Account Manager if you need VIP Notifications removed from the plan from Growth Reports removed.
- Turning Required Sends Per Event off on the parent community turns requirements off for every community that follows the parent's plan. Existing send dates stay in each event's schedule, but Event Owners can remove them without an error.
- The parent community shows combined results from all its communities.
Frequently Asked Questions
We planned VIP Notifications, but some events aren't sending any. Why?
Planning alone doesn't enforce sends. Set Required Sends Per Event above Off so every event has to keep a minimum schedule.
An event sent all its emails early and nothing near the event. How do we prevent this?
Mark later sends, such as 15, 7, and 1 day before, as Required in the Default Email Schedule.
Can we turn VIP Notifications off completely?
You can set Required Sends Per Event to Off so nothing is enforced, and Event Owners can delete scheduled dates or turn off group toggles in each event. To remove VIP Notifications from your Activation Plan, contact your InGo Account Manager.
We turned off required sends, but emails are still going out. Why?
Turning requirements off doesn't remove dates that are already scheduled. Delete the upcoming dates in each event's Manage Emails > Schedule, or turn off the VIPShare Emails toggle for the groups.
Can an event send more than the required number?
Yes. The requirement is a minimum.
I changed the default days, but an existing event didn't update.
Your change was probably saved with Save for New Events. Save again and choose Save for New & Existing Events.
Our Event Owner can't save their schedule. What do we do?
They removed a required date. Either they add it back, or you uncheck Required for that send here and choose Save for New & Existing Events.