
Sometimes a participant should no longer receive InGo outreach for your event. They may have cancelled, been added by mistake, or been uploaded as a test record.
To preserve data integrity, permanent participant deletion is an action that can only be performed by InGo Support. Instead, you can first move them out of their active participant group and into a dedicated suppression group. This allows you to stop applicable outreach while InGo Support permanently removes the records.
The process has four parts:
- Create a suppression group for the event
- Move the participants into that group
- Check VIP Notification schedule to ensure the suppression group won't receive sends
- Contact InGo Support to permanently delete the participants
Before You Begin
Make sure you have the list of participants you want to remove. For a large list, have their first name, last name, and email prepared in a .csv or .xlsx file.
IMPORTANT: If your VIP Notifications are scheduled for All Groups, moving participants into a suppression group will not stop those emails. All Groups sends go to every group in the event, including your suppression group. Follow Step 3: Check Your VIP Notification Schedule to make sure the participants are excluded from future sends.
Does Your Event have API Integration activated?
If your event syncs participants from your registration platform via API Integration, removal may already be handled for you.
| Registration platform | What happens when someone is no longer registered |
|---|---|
| Bizzabo, Cvent, RainFocus, Swoogo | InGo removes them automatically on the next sync. Cancel or remove the registration in your platform, and InGo takes care of the rest. No extra step, or request to InGo Support is needed. |
| ASP, Sessionboard, Visit by GES | Participants are not removed automatically. Follow the steps below and contact InGo Support to have them deleted. |
PRO TIP: InGo syncs with your registration platform once every 24 hours. If a VIP Notification is going out before the next sync, move the participants into your suppression group (Steps 1 to 3) so they don't receive it in the meantime.
Learn more in API Integrations: Overview and Getting Started.
Step 1: Create a Suppression Group
- Open your Event Summary page
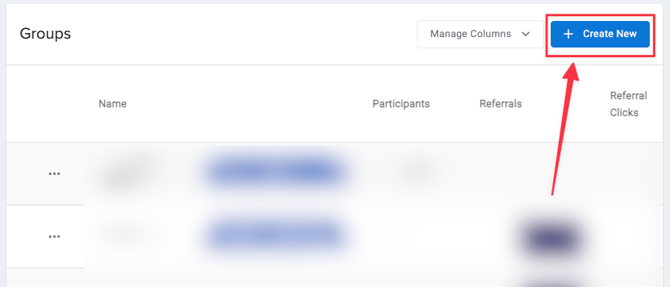
- Scroll down to the Groups section and click + Create New
- On the General tab, enter a clear Group Name, for example Suppress/Remove participants
- Under What kind of participant?, select Other
- Click Save and Close
Step 2: Move Participants Into the Suppression Group
There are two ways to do this. Move participants one by one from the Participants report, or upload a list to move many at once.
Option A: Move Participants with the Change Group functionality
Best for removing a smaller number of participants.
- On the Event Summary page, click Configure and select Registrants / Participants
- On the Participants page, find the participants you want to remove. Use Filter by to search, or select a group on the left to narrow the list
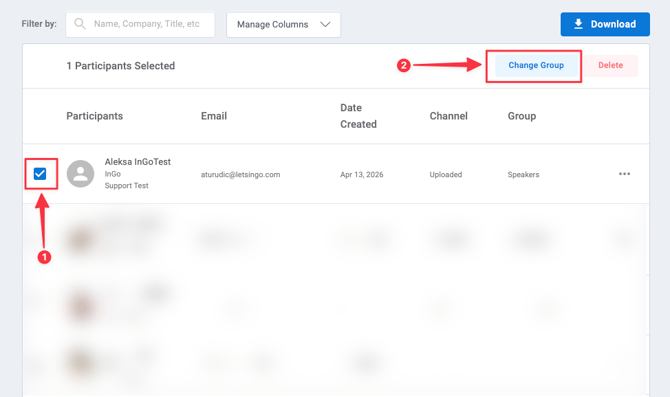
- Check the box next to each participant you want to move. The number selected appears above the table
- Click Change Group
- The Move Members modal appears
- Select your suppression group and click Move Members
The Group column now shows the suppression group for each participant you moved. Choose the suppression group on the left to confirm everyone is there.
NOTE: A participant move with Change Group is locked in. Later API syncs and spreadsheet uploads won't move that participant to a different group. For API-synced events, this means your suppression group holds, even if the registration platform still lists the participant under their original registration type.
Option B: Move a Large List through Upload
For a long list, there's no need to find and move each person by hand. InGo identifies every participant by their email address, so uploading a list of existing participants into the suppression group moves them in one go, without creating duplicates.
- Prepare a .csv or .xlsx file with the First Name, Last Name, and Email of each participant you want to remove. Name and Email are required for every row, and the emails must match the ones already in InGo
- On the Event Summary page, click Configure and select Registrants / Participants
- Click Upload Participants in the left sidebar, then choose Upload next to your suppression group
- Add your file, ensure your columns are mapped to First Name, Last Name, and Email, and click Apply mappings
- Review the rows, fix anything under Rows with issues, and click Import. InGo matches each email to the existing participant and moves them into the suppression group
- Open the suppression group on the Participants page and check that everyone from your file is there
For a full guide on uploads, see How to Upload Participants.
IMPORTANT for API-synced events: Unlike Change Group, an upload doesn't lock the participant's new group. If your event is connected to your registration platform through an API, the next sync can move participants back into a group based on what the platform sends.
Keep this in mind if your platform doesn't sync removals to InGo. A participant you've removed in the platform can stay in InGo, and can be moved out of the suppression group by a sync, until InGo Support deletes the record.
To make sure participants stay in the suppression group while they wait for deletion, use Option A: Change Group.
After Moving Participants
Participants in the suppression group no longer receive:
- VIP Share in Email
- VIP Share links
- VIP Notifications, provided the suppression group has no scheduled sends and your event doesn't use an All Groups schedule
Next, check your VIP Notification schedule.
Step 3: Check Your VIP Notification Schedule
VIP Notifications can be scheduled for All Groups or for individual groups. An All Groups schedule sends to every group in the event, so participants in the suppression group would still receive those emails.
- On the Event Summary page, click Manage Emails to open the VIP Notification schedule
- Choose All Groups on the left and check whether any send dates are listed
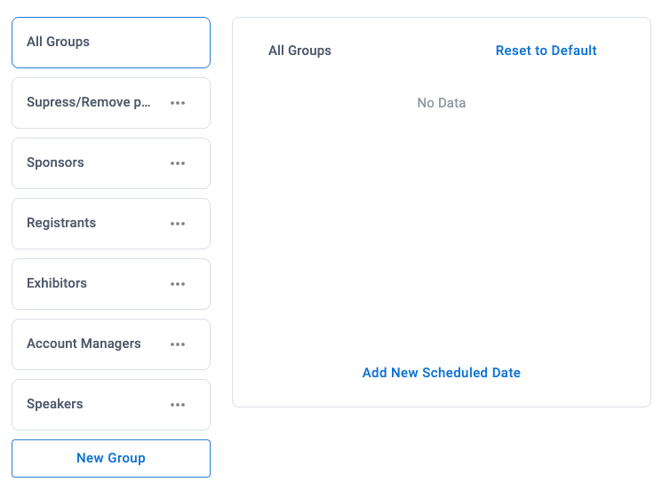
- If there are dates under All Groups, move them to the individual groups that should receive them:
- Select each group that should receive VIP Notifications and use Add New Scheduled Date to add its send dates
- Return to All Groups and click Delete next to each date
- Select your suppression group and confirm it has no scheduled dates
When All Groups has no dates and the suppression group has no sends of its own, participants in the suppression group are left out of all upcoming VIP Notifications.
Step 4: Ask InGo Support to Delete the Participants
Moving participants stops outreach, but the records stay in your event until InGo removes them. If your event uses Bizzabo, Cvent, RainFocus, or Swoogo and the participants are no longer registered in your platform, you can skip this step, since they'll be removed automatically on the next sync. To have participants permanently deleted:
- Email support@ingo.me or submit a request through Contact Us
- Include:
- The event name and summary link
- The name of the suppression group
- A note asking InGo Support to delete all participants in that group
InGo Support will confirm once the participants have been deleted.
Quick Reference
| Step | Where | What to do |
| 0. Check your API integration | Your registration platform: Bizzabo, Cvent, RainFocus, Swoogo. | Cancel participants in the platform and API removes them on the next sync |
| 1. Create group | Event Summary > Groups > + Create New | Name the group, set participant type to Other, Save and Close |
| 2. Move participants | Configure > Registrants / Participants | Select participants, Change Group, choose the suppression group, Move Members |
| 3. Check schedule | Event Summary > Manage Emails | Make sure no dates are set under All Groups and the suppression group has no schedule |
| 4. Delete | Email support@ingo.me | Send the event and group name and ask for the participants to be deleted |
Questions or need help? Contact support@ingo.me.