InGo Code Parameters
When setting up an event on InGo, the Widgets almost always need to be customized. Some customizations may be:
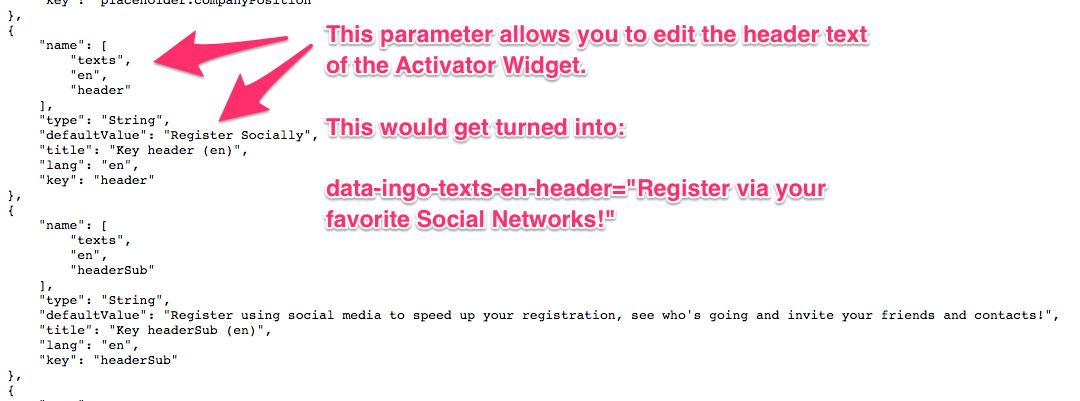
- The header text needs to be changed
- The manual registration link needs to be turned into a button
- The Autofill Widget needs to be mapped
- The color of the manual button needs to be changed
The following links contain all of the available parameters necessary to edit the InGo Widgets (languages included).
- Activator Widget: https://s3.amazonaws.com/cdn-ingo/widgets-login/latest/params.json
- Autofiller Widget: https://s3.amazonaws.com/cdn-ingo/widgets-registration/latest/params.json
- Amplifier Widget: https://s3.amazonaws.com/cdn-ingo/widgets-social/latest/params.json
- Authorizer Widget: https://s3.amazonaws.com/cdn-ingo/widgets-confirmation/latest/params.json
How to interpret the information in the parameter repositories in order to customize your Widgets.
- Look for the “name” of the parameter.
- Whatever is in-between the ‘brackets’ below the name is what you call the parameter within the code snippet.
- Upper letters split by "-" and keywords split by "."
- You must first add data-ingo- before the name of the parameter
- Interpreting the parameters and other examples:
Mapping the Autofiller:
data-ingo-fields-user.first-name=“#RegistrationFirstName”
Changing the text of the manual registration button: data-ingo-texts-en-label.button.register=”Register Without Social”
Removing the Invites tab from the Amplifier Widget:
data-ingo-show-tab.invitation="false"
Full Example:
<!--EVENTNAME Autofiller-->
<script src="https://cdn.ingo.me/widgets-loader/1.4.4/js/ingo.loader.widget.js" data-ingo-id="INSERT_AUTOFILLER_WIDGET_ID_HERE"
data-ingo-fields.user.first-name="#firstname_selector_here]"
data-ingo-fields.user.last-name="#lastname_selector_here"
data-ingo-fields.user.email="#email_selector_here"
data-ingo-fields.user.company="#company_name_selector_here"
data-ingo-fields.user.company_position="#company_position_selector_here"
data-ingo-fields.user.linkedin.profile-url="#linkedin_field_selector_here"
data-ingo-fields.user.twitter.username="#twitter_username_field_selector_here">
</script>